
You have set up your website and your Facebook Business Page. You’re now open and waiting for your first customers. You just realized that no one has yet discovered your business. Don’t bother handing out flyers on the street or stickers in pubs. They might help, but there’s an easier way.
It’s time to set up your first Facebook Ads Campaign. Here’s how!
Ads Manager and Payment Method
You first need to access your Ads Manager. For that you need to be logged in your Facebook account (on which you have the admin role for the page you will be creating the campaign for) and access Facebook’s Business Page.
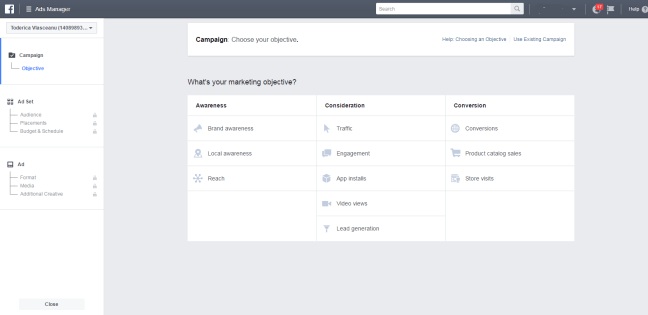
In the top right corner you’ll see two blue buttons. Click on “Create an Advert” and you will be redirected to you Ads Manager which will look like in the photo below.
You then need to set up a payment method. Click on the top left menu / All tools / Biling & Payment Methods. On the new screen select Add Payment Method and enter your bank card details (you could set this up later, but it’s better to get it over with).
Selecting you campaign type
Navigate back to the Ads Manager “home screen”. Unless you sell cookies in a specific New York neightbourhood, your first campaign should be a Traffic one. You should target you websites product or services page. This is the easiest way to get you started and gaining your first customers.
So go ahead and click on the Traffic button, the first one at the top of the ”consideration” column. Then you will be asked to name your campaign and click Continue.
Audience, budget and schedule
Unless you have an app you wish people to download, leave the “Website or Messenger” checked. Right below that you can ad an Offer (use this if you have a promotional discount for your first customers). It’s easy to set up so I won’t get into that.
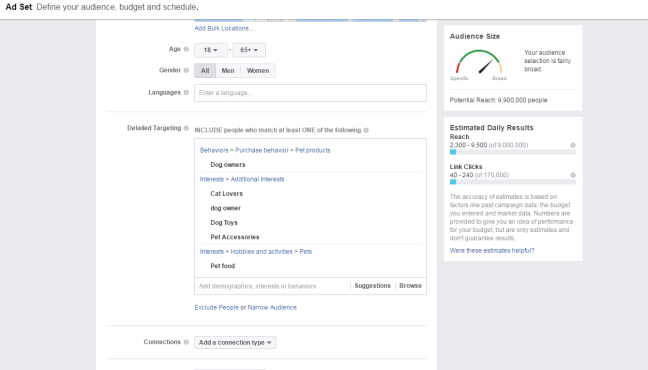
Next you need to select one or multiple locations. You can ad multiple countries, counties or cities. Make sure you select “People who live in this location” so you can make it more relevant. As you will be changing targeting parameters you will notice the Audience size and Estimated daily results in the right part of your screen will start to change.

Next you need to set the age bracket, gender and spoken languaces for your audience. Also you can choose from many types of interests and behaviours. Let’s say you sell dog products. You would want to target dog owners, who are interested in dog accesories and dog food and those who are likely to purchase such items.
You can also choose to target only your page’s followers or exclude them from the campaign. When you are done you can save this audience type for further use in future campaigns.
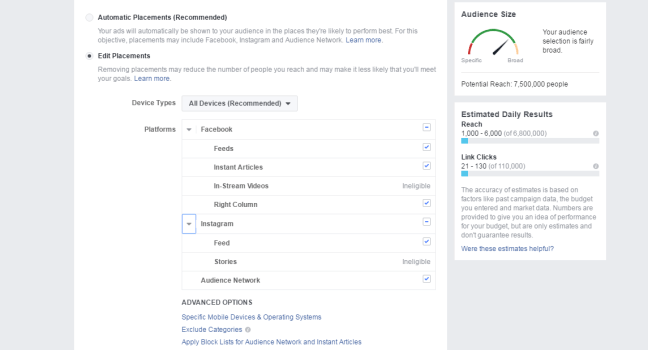
You can use placements to choose where your ads are displayed. You can target specific types of content, like videos or stories on Instagram and even specific types of operating systems and mobile devices. Or you can choose which ones to exclude.
Unless you target a very narrow audience it is best to leave these settings to Automatic Placements.
Next you need to set a budget and a schedule for you campaign. If you want your campaign to start right away you can leave the start date as is. You can also choose a future date to postpone your campaign.
You can choose Lifetime or Daily Budget. If you run a short campaign it’s better to set your daily budget. But if you do this you won’t be able to use Ad Scheduling.

With Lifetime Budget campaigns you can choose on which days and hours to display your ads. This is usefull if you already have insights on your audience or potential customers. Just click More Options and select when you want your ads to be shown.
Once you’re done, name your ad set and click continue.

Ad formats
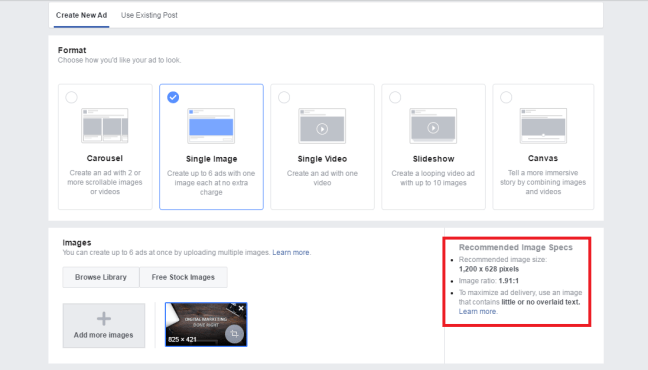
There are many ad formats to choose from. Each have their own strenghts and purposes. The easiest and also effective type would be the Single Image. So select that.
Next you need to upload an image for your ad. You can read about aspect ratio and image size on the right side of the screen. What you also need to know is that if you want your ads to display at their maximum potential, the images you use should have 20% or less text covering them. You can check that with the Text Overlay Tool.
Next you can set the page you wish to create the campaign for, the link you wish to be featured, headline, description and a call to action button.

Once you’re done, click “Place Order” and you’ll be notified when and if you’re campaign has been approved. Don’t worry: if you followed these steps you won’t have any problems.
What you should also know
There isn’t a specific ad recipe which works for all businesses and campaign types. Play around with your bugdget and monitor you campaigns to gain best results.
On the next tutorial I’ll talk about how you measure and interpret the results of your campaigns and about the Facebook Pixel. If you have any questions leave them in the comments and I’ll reply as soon as I can. Good luck!

I love it. Thanks for sharing.